i have been wanting to post for a while, but with kids there's no telling when you'll get the chance. i have been trying to put my garden together.
there sure is a lot of steps i guess i just never thought about them before. it was so obvious, i just never thought about how much time each step would take.
to build a raised bed 4x4 first you have to find a good spot in your yard. not too sunny, but one that gets at least 6 hours of sun a day. also you want to make sure it is relatively flat. that helps to not complicate things.
so once you've found your location you'll need some boards 2x6 and up. i used 2x10's becuase i wanted to have an extra deep bed, but you really only need 6" of soil to work with...except for the root crops (potatoes, carrots) i got my 2x10x4' boards for free at a construction site...i had to do some cutting of course. so cut the boards to 4 ft or you could do a 4x8 box, but my boards were only 5ft, so without having to buy boards, i was stuck with building just 4x4 boxes. (can't be deeper than 4ft cuz you can't reach in further than 2ft on each side...trust me, i made my 1st garden 5ft and there was an ugly patch of weeds right down the middle that i couldn't reach...)
so your boards are cut, now predrill holes for screws on one side in each board. line them up and put your screws in...the box is done! it will be heavy tho, so put it together very close to where it will be going...


next you put down landscape fabric to keep weeds from coming up into your awesome dirt... i went a step further and stapled the fabric to the bottoms of the boxes...i would advise you to get 4ft wide landscape fabric...it will save time. i thought i had picked a 4ft roll, turns out it was only 3... oh well. (picture of stapled landscape fabric to box below)

flip the box over.... and next mix the awesome dirt...

lay out a tarp (mine was 8'x10')
 and add the ingredients (1/3 compost, 1/3 peat moss, 1/3 vermiculite) if you do 6" of soil, you will need 8 cu ft of soil for a 4x4. or approx 3 cu ft of each ingredient. it doesnt have to be exact, but don't skimp on anyone of these! here's why:


so what were the kids doing all the while as i was working?
 kathryn loves to dig holes in the dirt...Grrrreeat....rock box coming soon!
 did i mention this little boy is in love with cars? cuz this is what he does all day long. a car in each hand, right where mommy is.

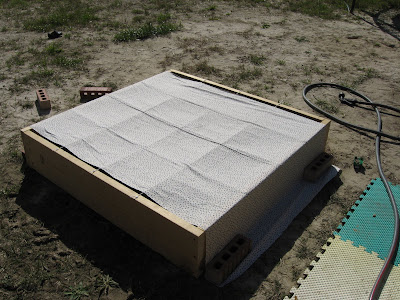 i covered my box with some fabric so the sun wouldn't zap the seeds to give them a chance to get established (and give me a chance to build that cage)
anyhow, i can't wait to have this gardening thing complete so i can start growing plants, harvesting FOOD and feel complete. haha. j/k.
i also decided store bought compost is NOTHING compared to homemade compost...i had een wanting to start a compost for a while, but preferred to have something round to put it in to be able to roll it around for easy mixing...meaning faster composting...well. i can't afford to really buy anything being as we are trying to get out of debt and i just spent money on my garden soil... so back to the construction sites! i got some scrap plywood and 2x4's and after a bit of cutting and screwing the boards together, i had a box!!! it is HUGE! i did 3x3x3 and i'm not sure i'll ever fill that up on my own!

good thing there are tons of FREE things to add to it to make awesome compost full of nutrients for your plants!!!
starbucks...they save their coffee grinds and bag them for you!!! how awesome! i spent the last 2 days finding starbucks and CC's coffees to get all their free used coffee grinds....i got a bunch. lol.
spoiled produce from local grocery stores/fruit stands... not walmart...i didn't bother trying them cuz they can be so stupid about things...but win-dixie, any associated grocer stores...they all throw out spoiled produce (or stuff that is going to go bad soon) and will give it to you for free...or for $1...not so bad. there comes my question of...how do you get this stuff in small pieces without taking a ton of time doing it? (the smaller the pieces of things you add to the compost, the faster it decomposes and turns into compost) and when will it be done?? (all the produce i got from win dixie for $1)
 this is a shot of the cardboard layer at the bottom with the shredded paper on top...next we tore some newpaper and phone books... then produce...
 kathryn helping me add the bags of salad from windixie...she was a great helper!
also, i will be looking for dried leaves to crunch up, and grass clippings and that is what will go in my pile. all free. yippee!
 and add the ingredients (1/3 compost, 1/3 peat moss, 1/3 vermiculite) if you do 6" of soil, you will need 8 cu ft of soil for a 4x4. or approx 3 cu ft of each ingredient. it doesnt have to be exact, but don't skimp on anyone of these! here's why:
compost is organic and the perfect natural fertilizer...fertilizing done, one less step to worry about. it's better to have home made compost, but if you get it from the store, get different kinds to have a better mix of nutrients. i suggest compost chicken manure, compost cow manure, and humus...composted peat moss or something like that. chicken manure can be found at Naylor's Hardware, the rest can be found at any big hardware store like Lowes, Home Depot, Stine's etc.
peat moss is great for keeping soil light and moist. this will never be added again as it is a non-renewable resource, and we don't want to waste it. it decomposes rather slowly, so it should last a while. get the bales of either 2.2 cu ft (expands to roughly 4 cu ft) or 3.8 cu ft (expands to roughly 8 cu ft) depending on how much you need.
vermiculite - what the heck is that you say? it is this amazing resource that holds water like a sponge...literally. it is made by heating up mica rock till it explodes (like popcorn) and what you get is chunks of light airy vermiculite. the water fills into all the open spaces, which the chunks are full of. so this is very necessary to keeping your soil loose but water retentive. the only place i've found that stocks this in the 4 cu ft bag you need (cheaper than buying all the 4 qt bags to equal 4 cu ft) is Naylor's Hardware off of Old Hammond right next to Millerville. it is 25.99, BUT you'll never have to buy it again, and you won't have to water as frequently!
so, add the ingredients in the tarp (i suggest doing 1 box at a time, the dirt gets rather heavy) take one side of the tarp (it helps if there are 2 people to do this) and pull towards the opposite side making sure none of the dirt spills. the do the same with the other side. i was doing this by myself, so this didn't work out too well for me, not to mention it was very windy (oh yeah, wet your ingredients well so they don't blow away -peat moss and vermiculite in particular) so i would recommend NOT doing it on a day that is super windy...but none the less.

i ended up shoveling the pile into the box and, using a rake, mixed the ingredients that way... whatever works for you. after you have your dirt, make sure it is moist, so give it a good water (any excess water will just run out - so no overwatering will take place!)

so what were the kids doing all the while as i was working?
 kathryn loves to dig holes in the dirt...Grrrreeat....rock box coming soon!
 did i mention this little boy is in love with cars? cuz this is what he does all day long. a car in each hand, right where mommy is.
next add grids. this is a very important part of SFG (square foot gardening) it helps you SEE where your spaces are so you know where to put your plants (in the middle of the square, or 4, 9, 16 per square, depending on what you are planting) once again, i wanted to use what i had on hand, so i screwed in 1/2 inch screws 3/4 of the way down (to give room to tie string to) 12" apart (approx. it was more like 11.5") and tied nylon string around the screws to make a grid. melt the ends btw or they will fray.

next...PLANTS YOUR SEEDS!!! FINALLY!!! sigh. i love watching things grow, and have been waiting to get this done since winter...and the time finally came...i'm glad i started earlier cuz it took me over the course of a week to get this done! and i only filled in 1 box of dirt! i am doing 3 4x4 boxes, the other 2 are waiting for their dirt and grids and SEEDS! but the wind was too much to finish, so i am waiting. today is a good day to get it done. i'm also gonna do 1 2x2 box 12" high for my carrots and potatoes. i'm interested to see what i get, since my carrots in my poor soil garden looked quite funny.
 i covered my box with some fabric so the sun wouldn't zap the seeds to give them a chance to get established (and give me a chance to build that cage)
so why the title? well, before i built my boxes i was looking over at my previous garden that has sad small lettuce plants and bent down to find quite a few of the plants horribly infested with tiny black bugs!! i would say they look like aphids, but aphids aren't black. i have no idea what they were, but i took an empty spray bottle, filled a little soap and water and went to town spraying the plants...only, a few days later, the bugs weren't completely gone, and the plants leaves that had soapy water on them were dead. what's the big deal, right? i mean, that garden is done, i am no longer harvesting the lettuce (good thing) but to see bugs on plants only means i'm going to see bugs on the plants in my good gardens...bugs means...stunned plants, well, it's not good lets put it that way.
i was going to make a cage out of chicken wire to keep animals and birds out, but it won't keep out bugs... so what is the point? UGH! that was my problem last year...grasshoppers and leaf miners...and they ate away at the plants before the plants even had time to grow! so i came up with a conclusion...window screen...they sell it in 4 ft rolls (YES!) and so i will use that instead of chicken wire and follow the same steps outlined in the Square Foot Gardening book. it will be expensive, but i shouldn't have to make these cages again, they should last for years... so, to protect my plants, i think it is worth it. we'll have to see how it goes.
right after i had kathryn help me plant the seeds (she LOVED that) daniel decided to tramp through the garden! ::sigh:: i only saw the end of it, and disciplined him then, so hopefully that won't happen again. that's what the cages are good for!
anyhow, i can't wait to have this gardening thing complete so i can start growing plants, harvesting FOOD and feel complete. haha. j/k.
i also decided store bought compost is NOTHING compared to homemade compost...i had een wanting to start a compost for a while, but preferred to have something round to put it in to be able to roll it around for easy mixing...meaning faster composting...well. i can't afford to really buy anything being as we are trying to get out of debt and i just spent money on my garden soil... so back to the construction sites! i got some scrap plywood and 2x4's and after a bit of cutting and screwing the boards together, i had a box!!! it is HUGE! i did 3x3x3 and i'm not sure i'll ever fill that up on my own!

good thing there are tons of FREE things to add to it to make awesome compost full of nutrients for your plants!!!
starbucks...they save their coffee grinds and bag them for you!!! how awesome! i spent the last 2 days finding starbucks and CC's coffees to get all their free used coffee grinds....i got a bunch. lol.
spoiled produce from local grocery stores/fruit stands... not walmart...i didn't bother trying them cuz they can be so stupid about things...but win-dixie, any associated grocer stores...they all throw out spoiled produce (or stuff that is going to go bad soon) and will give it to you for free...or for $1...not so bad. there comes my question of...how do you get this stuff in small pieces without taking a ton of time doing it? (the smaller the pieces of things you add to the compost, the faster it decomposes and turns into compost) and when will it be done??
(all the produce i got from win dixie for $1)i got creative. first i tried a shredder, but that took too long. so kathryn has been helping me tear newspaper and old phone books...
 this is a shot of the cardboard layer at the bottom with the shredded paper on top...next we tore some newpaper and phone books... then produce...
as for the produce...i got a 5 gallon bucket, chunked a few things in there, got a 3 ft 2x4, and started pounding away! lol. it worked! it broke up the pieces even onions and garlic too. and it didn't take long. and i didn't have to get my hands dirty! just dump the bucket, add more, etc.
 kathryn helping me add the bags of salad from windixie...she was a great helper!
and the coffee grinds just dump into the pile as well. my next step is finding a cow or horse pasture and with permission, scooping the manure and adding that. i know, how gross...but this is the main ingredient in gardening, and completely orgainic and FREE...so i am serious about it. i think it's fun figuring out how to spend no money on something (other than gas money) even if when it comes time to do it (scooping poop) i'm not as thrilled. it'll be worth it in the end (i hope) and i can teach my kids a valuable lesson. reduce, reuse, recycle... and of course, being self-reliant...growing their own veggies and making their own compost...
also, i will be looking for dried leaves to crunch up, and grass clippings and that is what will go in my pile. all free. yippee!
that's all the time i have for now. more to come tomorrow?
1 comment:
Impressive! Great job on EVERYTHING! Working on getting mine started when Jolie leaves. Have too much to do before she comes in. LOL.
Post a Comment